Getting started
There are two ways to get a Levelrail control plane running:
- Self-hosting on a real server with
install.sh, covered right below and in full in Installing. - Building from source, for contributing code, running an unreleased commit, or trying Levelrail out on your own machine without provisioning a server. Covered in Building from source.
Whichever one gets you a running control plane, Deploy your first app below works the same either way.
Start self-hosted
curl -fsSL https://levelrail.com/install.sh | sudo shThis downloads the latest release binary, installs Docker if it's missing, and starts the control plane as a systemd service. Before running it on a real server, check the requirements checklist: supported OS, a practical RAM/CPU/disk starting point, and which ports need to be open. Every option (pinning a version, running as a Docker container instead, upgrading, uninstalling) is in Installing.
Deploy your first app
Here's the path from local setup to a live app:
The app spec is the one declarative file you write in your app's repo: app.yaml (also discovered as app.yml, deploy.yaml, or deploy.yml). A minimal one looks like this:
version: 1
services:
  web:
    build:
      type: dockerfile
    port: 8080
Example app
test/fixtures/hello-e2e/Dockerfile in this repo is a real, working example: a tiny busybox image that listens on port 8080 and serves a static response. The end-to-end deploy test builds, deploys, and checks an HTTPS response against it. This is a genuine, exercised path, not hypothetical.
The full spec, with domains, health checks, resource limits, env, replicas, and deploy strategy, is documented in docs/app-spec-reference.md.
Setting up an admin account
Before you can deploy anything, the control plane needs an admin account. Choose one of three options:
- Register through the frontend on first run, using the one-time setup token the control plane logs on first start (or print it with
levelrail setup-token). - Set
APP_ADMIN_USERNAMEandAPP_ADMIN_PASSWORDbefore starting. - Start the control plane with
APP_DEV_MODE=1(dev mode only, never production).
Dev mode bootstraps a fixed dev/dev admin account and fixed API tokens from dev-fixtures.yml at the repo root. This lets you skip the register-then-mint-a-token steps. A release build (-tags embedweb) ignores APP_DEV_MODE outright, so it cannot run in dev mode.
The setup wizard
The first time an admin signs in to a fresh instance, the dashboard opens a setup wizard instead of an empty app list:
- Server check runs the same checks as
levelrail-cli doctorand Settings, System status. Every failing check shows a copyable fix command and a docs link. Only a hard failure (Docker, the database, or the data directory) blocks you; warnings do not. - Dashboard domain (optional, recommended) asks for a domain and an email for certificate notices, shows the exact A or AAAA record to create using the server's detected public IP, then watches DNS resolve and the HTTPS certificate get issued. Continue stays disabled with the reason spelled out until both are green, or you can skip it.
- Git provider (optional) links to each provider's connect flow in a new tab and notices when one connects.
- First app deploys a one-click sample (
nginx:alpinewith a health check), a template, or your own repo, and waits until it is healthy. If it fails, the wizard shows the automatic diagnosis and a link to the logs. - Done summarizes what you set up and links to alerts, backup targets, and inviting users.
Progress is saved on the server, so reloading or signing in from another browser picks up where you left off. Dismiss setup hides it for good; reopen it any time from Settings, Setup wizard. Only admins see the wizard.
Creating an app from the CLI
With the control plane running in dev mode and levelrail-cli built, create and deploy an app in one command:
APP_API_TOKEN=dev-root-token ./levelrail-cli apps create \
  --name your-app \
  --file app.yaml \
  --repo https://github.com/your-org/your-app \
  --image-repo registry.example.com/your-org/your-app
This creates the app and triggers a real BuildKit build from the git repository you point it at.
Check on it with:
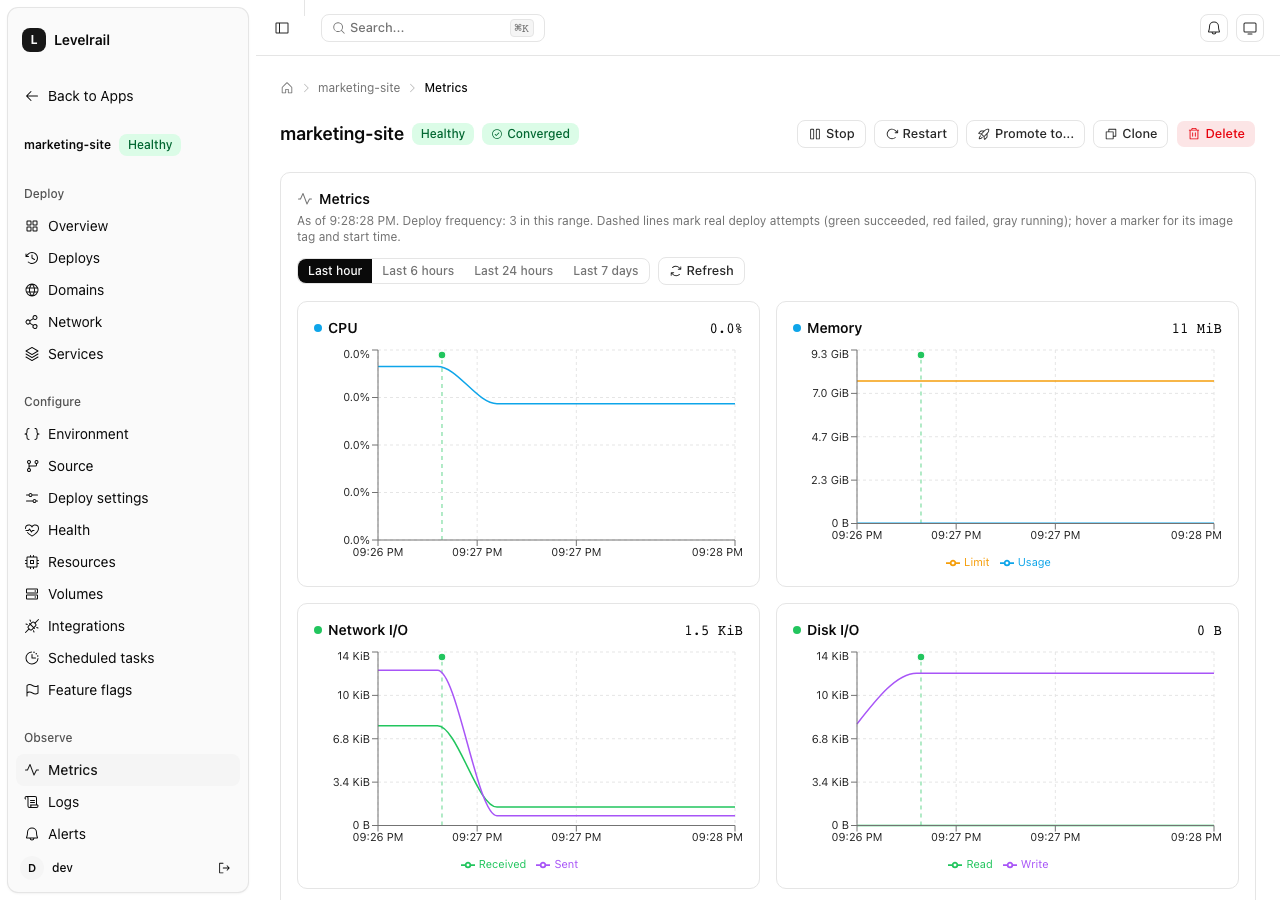
APP_API_TOKEN=dev-root-token ./levelrail-cli apps status your-appOnce deployed, the dashboard shows live metrics and deploy history in one view:
Using a prebuilt image
If you already have a built image and don't need Levelrail to build it, skip --file/--repo/--image-repo and use the existing-image path instead:
APP_API_TOKEN=dev-root-token ./levelrail-cli apps create \
  --name your-app --image registry.example.com/your-org/your-app:latest --port 8080
Importing something you already have
You do not need an app.yaml to get started. Paste a GitHub, GitLab, Gitea or Bitbucket repo URL, a docker run command, an image reference, a docker-compose.yml or a Dockerfile into the "Import anything" box in the New app dialog and Levelrail shows a deployment plan (build method, port, environment variables, volumes, warnings) before creating anything. From the CLI:
./levelrail-cli import https://github.com/your-org/your-app
./levelrail-cli import https://github.com/your-org/your-app --deploy --env API_TOKEN=abc
See importing-apps.md for every input type and the list of unsupported docker run flags.
Other CLI commands
Run levelrail-cli apps create -h for the full set of flags.
Other common commands:
apps deploy- deploy an appapps rollback- revert to a previous versionapps restart- restart running containersapps logs(add--followor-fto tail live)apps metrics- view app metricsdatabases create- create a databasedatabases metrics- view database metricsnodes metrics- view node metrics
Run levelrail-cli -h for the complete list of commands.
Guided setup for apps
Don't want to hand-write app.yaml or look up every flag first? Run the wizard instead:
./levelrail-cli apps create --interactiveThe wizard prompts for:
- App name
- Source (git repository URL or existing Docker image reference)
- Container port
- Optional domain
- Optional health check path (defaults to
/healthz) - Optional memory/CPU limits
- Whether to write to
app.yamlor create the app directly against the control plane API
Short form: -i (cannot be combined with --name/--image/--repo/--file).
WARNING
This wizard only creates single-service apps (exactly one entry under services:). For multi-service apps (a web process plus a worker sidecar under one app.yaml), hand-write multiple entries in app.yaml's services: map, or use POST /api/v1/apps/{name}/deploy-spec (and its dashboard equivalent, an app's Services tab). See docs/roadmap.md for current caveats.
Guided setup for databases
databases create has the same guided mode:
./levelrail-cli databases create --interactiveThe wizard prompts for:
- Database name
- Engine (from the live registry at
GET /api/v1/database-engines; newly added engines appear automatically) - Version (defaults to the engine's suggested version)
- Optional memory/CPU limits
- Whether to expose it outside the Docker network
- Optional backup schedule
Unlike the apps wizard, this one always creates the database against the control plane API. app.yaml's databases: block has no field for resource limits or public access, so there is no file-output mode.
Short form: -i (cannot be combined with --name/--engine/--version).
Output formats and filtering
Every command accepts --output json|table|text and --query EXPR alongside --token, --api-url, --profile, and --json flags.
Output formats:
table(default, human-readable)text(plain tab-separated, no headers, for piping throughawk/cut)--json(shorthand for--output json, preserved for backward compatibility)
The --query flag takes a JMESPath expression to filter or project results in any format (same feature AWS CLI users know):
# every app's name, whatever node it's running on
./levelrail-cli apps list --query "[].name"

# just the apps on a specific node
./levelrail-cli apps list --query "[?node_id=='node-1'].name"

# a single field off a single app, with no JSON wrapper
./levelrail-cli apps get your-app --query image --output text
Note: apps list returns a bare JSON array (not wrapped in an "apps" key), so expressions index straight into it rather than starting with apps[...].
Run levelrail-cli <command> -h to see --output and --query flags for any command.
Shell completion
levelrail-cli can generate completion scripts for bash, zsh, or fish. Coverage includes every command and subcommand plus global flags (--token, --api-url, --json, --output, --query, --help). It does not complete flag values or positional arguments like app names.
To install completion for your shell:
source <(levelrail-cli completion bash)

# To install permanently:
levelrail-cli completion bash | sudo tee /etc/bash_completion.d/levelrail-cli > /dev/nullsource <(levelrail-cli completion zsh)
# To install permanently, save as `_levelrail-cli` somewhere on $fpath:
levelrail-cli completion zsh > "${fpath[1]}/_levelrail-cli"levelrail-cli completion fish | source
# To install permanently:
levelrail-cli completion fish > ~/.config/fish/completions/levelrail-cli.fishRun levelrail-cli completion -h for the same instructions from the CLI itself.
Building from source
Building from source is the path for contributing code, running an unreleased commit, or trying Levelrail out locally without provisioning a server. See the repo's CONTRIBUTING.md for branch and commit conventions and how to run the test suite before opening a PR.
Requirements
- Go 1.26+
- Docker (a running daemon is required; the control plane and agent talk to the Docker Engine API directly and never shell out to the
dockerCLI) - Node.js and npm (only if building the frontend from source; a recent LTS release works, no pinned version)
Build the binaries
The control plane and node agent are separate Go binaries:
# control plane
go build ./cmd/levelrail

# node agent
go build ./cmd/levelrail-agent
There's also a CLI, a thin scriptable HTTP client for the control plane's API:
go build ./cmd/levelrail-cliFrontend
The frontend lives in web/ as a separate Vite project. It's embedded into the control plane binary via embed.FS at build time, so production deployments don't run a separate Node process.
cd web
npm install
npm run dev       # Vite dev server
npm run build      # type-check and produce a production build in dist/
See web/README.md for lint, format, typecheck, preview, and other commands plus conventions.
The control plane binary listens on :8080 by default.
The "Get set up" checklist
After your first login, the dashboard shows a "Get set up" card that walks you to a safe production setup. Each row reads live state from the control plane and links to the right page:
- Connect a Git provider
- Deploy your first app
- Add a custom domain with a valid certificate
- Add a backup target and create a control plane backup (
levelrail-cli control-plane-backups create) - Create a notification channel and an alert rule
- Enable two-factor authentication on the admin account
- Set the dashboard URL
A row that your account cannot see (for example a 403 or 404 from its endpoint) is shown as unavailable and left out of the progress bar. Dismiss the card with the X button (remembered in your browser), or let it hide itself once every available step is done. It is shown to root accounts only.
See also
- importing-apps.md - import a repo, image, docker run command, compose file or Dockerfile with a plan preview
- app-spec-reference.md - full
app.yamlschema with all fields and options - domains-and-ingress.md - setting up domains and HTTPS
- architecture.md - how the control plane, agent, and reconciler work together
- comparison.md - how Levelrail compares to Coolify, Dokploy, and CapRover
- roadmap.md - current status and what's planned
- master-key-rotation.md - rotating encryption keys